How to write test cases

After months of late nights, endless cups of coffee, and countless meetings, your product is (finally! 😅) nearly ready for release.
The next item on your do-to list is product testing. That's where test cases come in, they are your checklist for thorough testing. Though test cases aren't rocket science, there's an art to writing a test case that pushes your product to its limits (in a good way, of course).
Let's dive in! 👇
What is a test case?
A test case describes a set of actions a user will take when interacting with your product, plus what is supposed to happen after those actions. While you test your product, you'll these test cases as your checklist, making sure the user can complete each action successfully.
For example, a test case for a signup page might be "user types in a valid username and password", with the intended result being that the product stores this info and shows a "thanks for creating an account" modal.
Test case vs. test scenario
Now, if you've read anything online about test cases, you've probably seen them called "test scenarios." They are different things, however.
Test cases describe a specific situation in detail, whereas test scenarios describe testing a functionality at a high level. Test scenarios often include multiple test cases.
In an everyday testing situation, you might have three test cases looking at how your product reacts to the usernames "katiegoodal," k@ti3g00dal," and "katiegoodall1." These three test cases would be part of the "test username inputs" test scenario.
How to write a great test case
You don't need to be an English major or a celebrated poet to write a killer test case. Anyone can write a good test case by following the seven simple steps below:
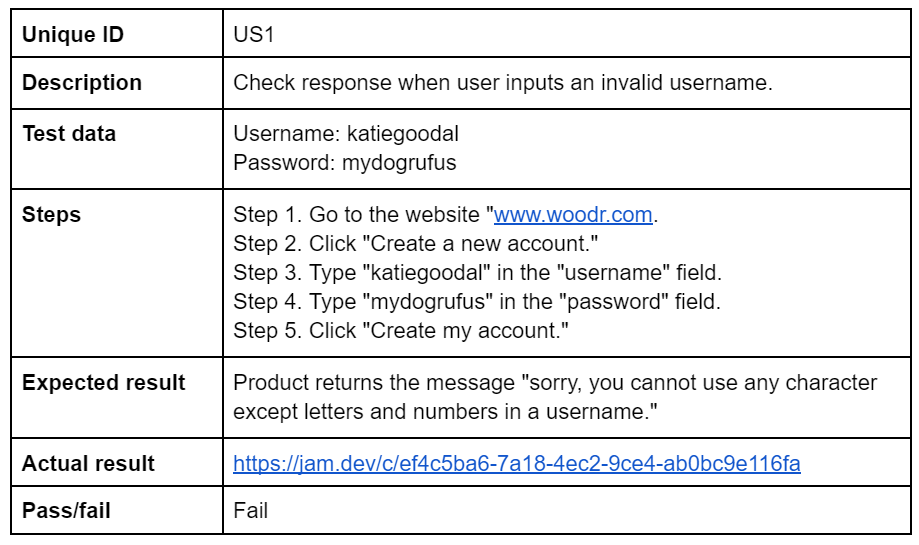
Step 1. Give your case a unique ID
Before you dive into detail, you need to mark your test case with a unique identifier so you can refer to it easily later. It's faster to say "test case WD19" than "the test case with the '@' username."
You can use any system you like — "a," "b," "c,"/ "1," "2," "3," etc.
If you are using multiple test scenarios, we recommend assigning a letter identifier to each test scenario and numbers to each test case. So, test scenarios concerning usernames might be labeled "US1," "US2," and "US3," etc.
Step 2. Describe the case in detail
Next, you need to add 1-2 sentences explaining what the test case covers.
If you were testing the process of creating an account, for example, one test case might have the description "check response when user inputs an invalid username containing too few characters."
Step 3. Note any test data you might need
Anyone on your team should be able to pick up your test case and carry out testing just as well as you would. Naturally, they'll need to know exactly what data to input — key by key.
In the example of testing how your product responds to usernames, you would need to provide these names and the passwords for each. So, you might include the username "katiegoodal" and password "mydogrufus" for the test case "US1."
Step 4. Add repeatable steps
We've covered the "what" of your test case, so it's time to focus on the "how." Describe the steps the tester will need to take for your test case as simply and explicitly as possible. Aim for steps your grandparents could follow. Like these:
"Step 1. Go to the website "www.woodr.com.
Step 2. Click "Create a new account."
Step 3. Type "katiegoodal" in the "username" field.
Step 4. Type "mydogrufus" in the "password" field.
Step 5. Click "Create my account."
Step 5. Estimate your expected result
The final thing you need to include in your test case before you actually start the testing process is what you expect to happen after the tester follows your steps.
You don't need to go into detail here — you only need to include 1-2 sentences. For "US1," for example, you might write "product returns the message "sorry, you cannot use any character except letters and numbers in a username."
Tip: If the expected result is complicated to explain, try including a screenshot or gif. (You can use Jam to quickly record a video and generate a shareable link to that video to paste in your test cases doc or spreadsheet!)
At the end of "Step 5. Estimate your expected result," your test case might look something like this:

You might notice we've left two final columns unfilled. We'll cover those next.
Step 6. Write your actual result
Immediately after you've conducted the test, you'll want to fill in exactly what happened.
If the test was successful (yay! 🚀), you could simply re-write your expected result, or "✅".
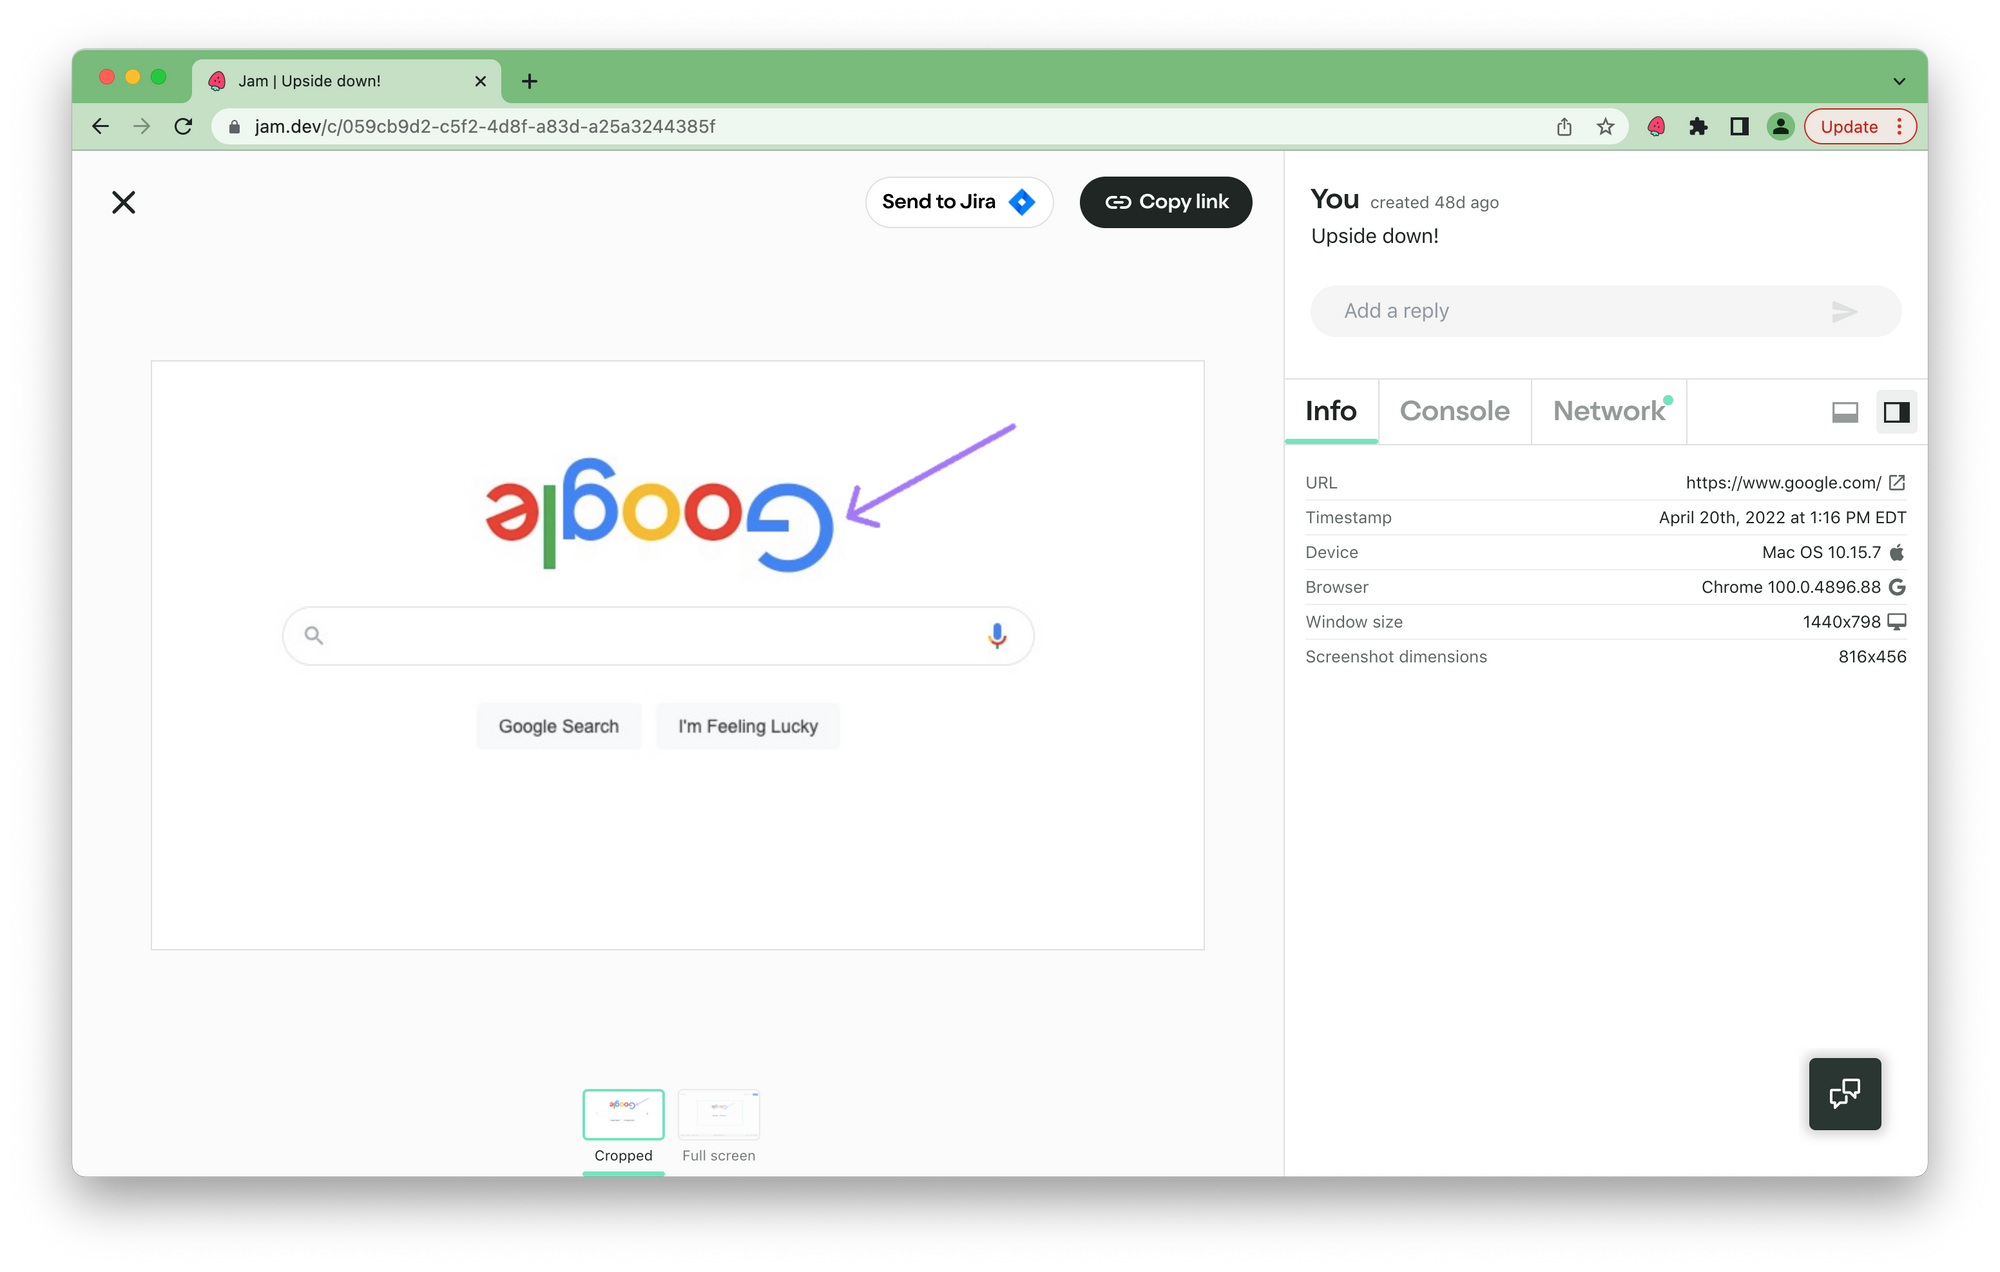
However, if the test was unsuccessful, you should include as much detail as possible so that your dev team can identify where the problem lies and fix it ASAP. The quickest way to do that is with Jam.
Jam lets you quickly grab a video of the last 30 seconds of what happened while testing, and share a link with all the debugging information developers need to fix the issue like: device & browser info, console logs and network requests.
To add your report to your test case, simply copy across the link Jam generates.
Step 7. Determine if your case passed or failed
Finally, you need to note whether your test case passed or failed, based on whether your actual and expected results match.
Now that we've worked through all seven steps, your test case will likely look something like this:
Best practices in writing test cases
We've already covered the nuts and bolts of writing test cases, but before we conclude, just wanted to leave you with some quick tips to help you write the best test case possible:
🥁...Without further ado:
- Always think about the end-user and their motivations.
- Be explicit with your descriptions. The tester shouldn't need to guess what you mean.
- Store all test cases together securely. You never know when you'll want to refer back to them.
- Ask your teammates to review your test cases. They may see things you missed.
- Use a standard template for all test cases.
- Add preconditions and postconditions if applicable.
Happy testing! 🙌
Writing test cases can feel daunting, but it doesn't need to be. Test cases simply describe a set of actions people take when using your product. They include:
- A unique key
- A description
- Test data
- The steps required
- The expected result
- The actual result
- Whether the test was successful or not
For best results, provide details, be concise, and, when you need a quick way to show developers a failed test case with all the debugging info automatically there, we hope you will choose Jam. 🚀
Jam's free Chrome extension can produce a detailed bug report for you in seconds. Jam integrates with the tools you already use to track fixes like Slack, Jira, Asana, and Linear.